A Comprehensive Guide on WordPress Files and How to Use Them
Source: https://kinsta.com
WordPress files form the foundation of your WordPress website. The directory of files resides on a server – whether that server is owned and stored in your own office or managed by a hosting company. Inside those directories are various folders and files, each of which serves a purpose for delivering commands and serving up content to the end-user.
For my server relocation within my hosting provider, I have gathered the essential content as included below from the aforementioned site. Visitors seeking a detailed understanding of the information mentioned here are kindly advised to visit the source site provided above, which offers a comprehensive overview.
WordPress Core Files
Often referred to as a clean or blank WordPress installation, the group of files you initially download to install WordPress for the first time make up what’s known as “WordPress Core”.
These core files eventually end up forming the admin interface of your website and work together to deliver the right content to the frontend.
Quite a few core files exist, but some primary ones include:
- wp-admin
- wp-includes
- index.php
- license.txt
- readme.html
- wp-activate.php
- wp-blog-header.php
- wp-comments-post.php
- wp-config-sample.php
- wp-cron.php
- wp-links-opml.php
- wp-load.php
- wp-login.php
- wp-mail.php
- wp-settings.php
- wp-signup.php
- wp-trackback.php
- xmlrpc.php
Below is an example to give you an idea of what some of the core files look like. This is the wp-config.php file (which is provided from WordPress as wp-config-sample.php and either changed manually or automatically converted to a wp-config.php file depending on the installation process).

Most WordPress core files are annotated with comments that tell you what each function does, or sometimes straight out explains what the entire file does for your website.
Understanding the core files is imperative if you plan on troubleshooting common WordPress errors and moving around the backend of your website with knowledgeable insight. Not to mention, the core files truly show you how WordPress works as one unified ecosystem.

Each file has its purpose. Some are more important than others, while you shouldn’t have to think about some of the files too much. In the following sections, we’ll go into detail about the essential core files, outlining what each one does for your website and whether or not there’s any reason for you to edit those files. Not every WordPress file will be covered, only the notable ones.
The .htaccess File
The .htaccess file is part of WordPress’s top directory, serving as a basic configuration file on the Apache web server. If you’re hosting on Kinsta, you may notice that you can’t find the .htaccess file. That’s because Kinsta uses the Nginx web server, which provides better performance than Apache.
Overall, both Apache and Nginx offer similar options for adding special rules and configuring redirects.
We have a complete guide about the .htaccess file if you have sites on some other hosts. The Apache web server is most common for budget shared hosts, and it offers configuration settings to tell your web server how to work. In WordPress, the .htaccess file is particularly important for controlling your website’s permalinks and making them look clean and standardized throughout your website.
As mentioned, a Kinsta-hosted site owner won’t be able to locate an .htaccess file by going through an FTP connection.

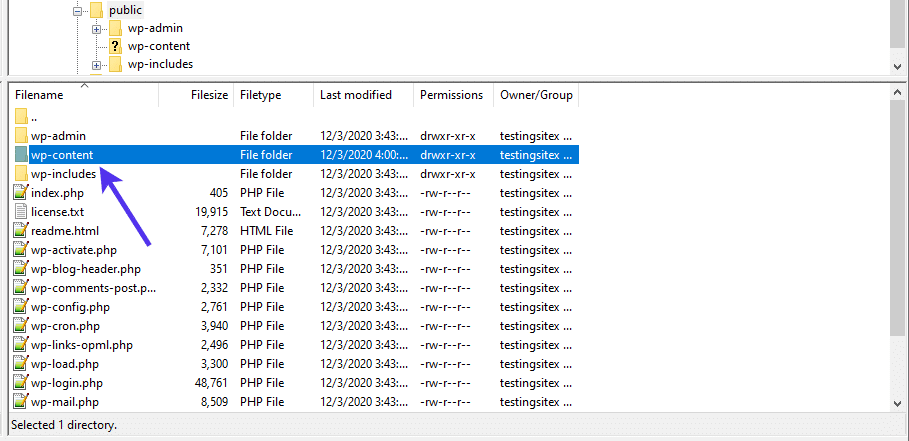
However, for other hosts, the .htaccess file is listed in the top directory, near essentials like index.php and below the wp-admin, wp-content, and wp-includes folders.

When to Use the .htaccess file
Most of the time, the .htaccess file should be left untouched. However, there are several actions and redirects you can activate by adding to or changing the file.
In Kinsta, these actions are done in the MyKinsta dashboard. For instance, you can set up redirect rules, block IP addresses, and place a password on your site in the dashboard, all things you could typically complete with a standard .htaccess file.
Overall, the .htaccess file is best when you need to make the following rules or complete these actions:
- Increasing the max upload size for media items and files.
- Blocking access for specific IP addresses.
- Setting up redirects from one URL to another.
- Adding rules to the file so that cached content gets served up in a more efficient manner.
- Redirecting HTTP to HTTPS.
The wp-config.php File
The wp-config.php file is both essential and highly useful for all WordPress users since it contains all basic WordPress settings. This means that the wp-config.php file lets you edit various areas of your WordPress site, from the database to making it possible to auto-update your WordPress version. Another reason wp-config.php is so important is because it offers options to activate a WordPress debugging feature, making it vital for troubleshooting in the future.
Accessible through an FTP Client, the wp-config.php file is found by going to the public (sometimes called public_html or www) file under your root directory.
You can locate the wp-config.php file near some of the primary WordPress folders, in the list of files like wp-cron.php and wp-comments.php.

Here are the default contents of the wp-config.php file:
<?php
/**
* The base configuration for WordPress
*
* The wp-config.php creation script uses this file during the
* installation. You don't have to use the web site, you can
* copy this file to "wp-config.php" and fill in the values.
*
* This file contains the following configurations:
*
* * MySQL settings
* * Secret keys
* * Database table prefix
* * ABSPATH
*
* @link https://wordpress.org/support/article/editing-wp-config-php/
*
* @package WordPress
*/

// ** MySQL settings - You can get this info from your web host ** //
/** The name of the database for WordPress */
define( 'DB_NAME', 'database_name_here' );

/** MySQL database username */
define( 'DB_USER', 'username_here' );

/** MySQL database password */
define( 'DB_PASSWORD', 'password_here' );

/** MySQL hostname */
define( 'DB_HOST', 'localhost' );

/** Database Charset to use in creating database tables. */
define( 'DB_CHARSET', 'utf8' );

/** The Database Collate type. Don't change this if in doubt. */
define( 'DB_COLLATE', '' );

/**#@+
* Authentication Unique Keys and Salts.
*
* Change these to different unique phrases!
* You can generate these using the {@link https://api.wordpress.org/secret-key/1.1/salt/ WordPress.org secret-key service}
* You can change these at any point in time to invalidate all existing cookies. This will force all users to have to log in again.
*
* @since 2.6.0
*/
define( 'AUTH_KEY', 'put your unique phrase here' );
define( 'SECURE_AUTH_KEY', 'put your unique phrase here' );
define( 'LOGGED_IN_KEY', 'put your unique phrase here' );
define( 'NONCE_KEY', 'put your unique phrase here' );
define( 'AUTH_SALT', 'put your unique phrase here' );
define( 'SECURE_AUTH_SALT', 'put your unique phrase here' );
define( 'LOGGED_IN_SALT', 'put your unique phrase here' );
define( 'NONCE_SALT', 'put your unique phrase here' );

/**#@-*/

/**
* WordPress Database Table prefix.
*
* You can have multiple installations in one database if you give each
* a unique prefix. Only numbers, letters, and underscores please!
*/
$table_prefix = 'wp_';

/**
* For developers: WordPress debugging mode.
*
* Change this to true to enable the display of notices during development.
* It is strongly recommended that plugin and theme developers use WP_DEBUG
* in their development environments.
*
* For information on other constants that can be used for debugging,
* visit the documentation.
*
* @link https://wordpress.org/support/article/debugging-in-wordpress/
*/
define( 'WP_DEBUG', false );

/* That's all, stop editing! Happy publishing. */

/** Absolute path to the WordPress directory. */
if ( ! defined( 'ABSPATH' ) ) {
define( 'ABSPATH', __DIR__ . '/' );
}

/** Sets up WordPress vars and included files. */
require_once ABSPATH . 'wp-settings.php';
When to Use the wp-config.php File
If you’re curious about the intricate details of this essential file, you can learn more about the wp-config file here. In general, it’s one of the most important files you have in the WordPress directory. That’s because much of the system infrastructure is configured using the wp-config.php file and it has definitions and PHP instructions to ensure that WordPress runs smoothly.
It’s not that common for a developer to access the wp-config.php file on a regular basis, but there are some reasons to consider modifying what’s in the folder or even what things are named:
- For editing the entire file system, or at least the structure or naming of the folder so that hackers and other intruders can’t easily locate some of the more important parts of your file directory.
- To put WordPress into debug mode or save queries that may be helpful when troubleshooting your system in the future.
- When you need to modify content related settings. Many content settings are stored in the wp-config.php file. For example, you can change settings for WordPress revisions, how often you empty the trash, and how often an automatic save is completed.
- Set your allowed PHP memory limit so that larger websites and multisite configurations end up working on WordPress.
- When you need to update important security settings.
- To change the settings for automatic updates to the WordPress core. Although it’s a good idea to keep an automatic update on for security purposes, there are some instances where deactivating this could be helpful.
- To completely lock down the wp-config.php file so that no one can access it.
The wp-admin Folder
What’s great about the naming of these folders and files is that you quickly realize that they all make quite a bit of sense.
For instance, the wp-admin folder holds a wide variety of files and folders that control the WordPress admin dashboard. By this we mean the interface you log into every time you’d like to add a page or post to your website. Without the wp-admin folder, you wouldn’t have such a beautiful user experience when managing a website.
Also inside the root site folder, wp-admin is usually the first folder listed in your WordPress file directory, mainly since it’s in alphabetical order, but also because folders are usually listed prior to files.

Some of the files that make up the wp-admin folder include:
- /css
- /images
- /includes
- /js
- /about.php
- /admin-header.php
- /admin.php

Many of these are considered core WordPress files, all of them coming together to formulate a solid infrastructure for the WordPress dashboard.
However, one, in particular, is rather important to know about. That’s the admin.php file.

The admin.php file serves as the primary engine that drives the wp-admin folder and brings together many of the other files to make them work. For example, the admin.php file checks admin permissions, blocking out users who shouldn’t have access to valuable parts of the dashboard. The admin.php file also links to the WordPress database and loads much of the admin dashboard.
Some other core files in the wp-admin folder include:
- network.php – Controls the functionality of your WordPress multisite infrastructure.
- users.php – The file that manages the user admin module, taking into account which users have admin access and which ones don’t.
- update.php – Handles new updates to the WordPress system, like when WordPress comes out with a new version or you add or update a new theme or plugin.
When to Use the wp-admin Folder
Seeing as how the wp-admin folder should usually be left alone for the lifespan of your website, there’s not much to say about when to edit or use the wp-admin folder.
However, there are some instances where locating and replacing, or even renaming, the wp-admin folder can serve you well.
First, it’s not a bad idea to consider changing the location and permissions to your wp-admin folder. Anyone with some WordPress experience knows the location of these important files; it’s easy for them to find and tamper with them. That’s why strong permissions will block anyone from using them in the first place. Another option is to change the location and ensure that your wp-admin login URL is renamed so that it’s not easy to try a brute force login attempt. Even so, this is generally done with a plugin and not tapping into the file itself.
The other reason you may consider modifying the wp-admin folder is if it’s corrupted or hacked in some way. In this situation, you’re simply replacing the file with a clean one. So, you’re still not really editing any of the contents of the wp-admin folder, but rather swapping it out for an older backup of the folder or downloading and installing a new version.
The wp-includes Folder
Almost all of WordPress is reliant on the wp-includes folder. This core folder contains a myriad of packages waiting to get delivered for many of the frontend and backend elements of WordPress to perform.
One way of explaining wp-includes is that the folder provides the common functionality needed for the WordPress REST API. In simpler terms, that means the files in other folders utilize what’s inside the wp-includes folder, using those files as resources to complete their own tasks.
Think of the wp-includes folder as a toolbox. Other core folders and files like wp-content and wp-admin are the workers and leaders that reach into the wp-includes toolbox whenever something needs to get done.
For instance, if the wp-content folder wants to generate elements of a theme or plugin it first needs to consult with the wp-includes folder to ensure the elements are compiled the right way for WordPress. The same can be said about the wp-admin folder, except that wp-admin consults with the wp-includes folder for backend purposes.
Therefore, wp-includes is one of the most critical folders in WordPress, and it actually holds much of the major WordPress source code. This involves both the front and backend of WordPress, making it an all-encompassing folder.
Another way to think about the wp-includes folder is like a library, where the rest of the core files are researchers compiling information to complete a study or write a paper. All that powerful data is stored inside the wp-includes folder, so the researchers (other core files) always have to reach into the library to find exactly what they need.
Like some of the other core files already discussed, wp-includes is under the core public folder, in the list of folders with wp-content and wp-admin.

Seeing as how the wp-includes folder completes so many tasks when called upon and contains so much code, it makes sense that hundreds of files are packed into the folder.
The default wp-includes folder currently has 196 files and 22 directories.
Some of the directories include:
- assets
- blocks
- certificates
- css
- fonts
- images
- requests
- widgets
Some files include:
- admin-bar.php
- author-template.php
- blocks.php
- feed-rss.php
- functions.php
- http.php
- plugin.php
- post-formats.php
- query.php
- shortcodes.php
- template.php
- theme.php
Even just looking at those files shows the power of this directory. Those are all PHP files filled with code to allow those elements to function. You can see that wp-includes houses much of the activity coding for themes, queries, shortcodes, and widgets, only to name a few.
One crucial file from this directory is called functions.php .

It’s essential to know about the functions.php file because developers and site owners often use it to change or add features to websites. The functions.php file acts like a plugin, calling upon functions already implemented in your files to produce something new.
Unlike many files inside the core, it’s not considered a bad thing to edit the functions.php file, as long as you have the knowledge to do so.
Furthermore, this core functions.php file isn’t the only functions.php file available inside WordPress. Each theme you install on WordPress also has its own functions.php file, allowing you to incorporate theme-dependant features that only work if the theme is installed and activated on your website.
None of the functions.php files add content or data to your website. Instead, they provide coding to modify the way your site acts or looks for the user. Therefore, the functions.php file wouldn’t serve up images or text but rather change something like the way a button appears or how it responds to being clicked.
Therefore, the core functions.php WordPress file remains inside your file directory forever. Any changes you make to the file are reflected on your website until you remove that code. The functions.php functionality created from theme files gets removed when the theme is deactivated from your website.
When to Use the wp-includes Folder
The wp-includes folder contains an incredible amount of code to be used on the frontend and backend of your website. The core WordPress API is held in this folder, so it’s a good idea to leave it alone. In most situations, you could make it a read-only folder. The primary reason you may want to edit something in wp-includes is when messing around with the functions.php file.
Again, you’re better off skipping wp-includes when thinking about making edits, but here’s a list of the instances you may consider opening and using the wp-includes folder:
- To hide or protect the
wp-includesfolder from the public. This can be done with the help of permissions or by hiding the file altogether. This is often completed with the help of a plugin. - To make edits to the
functions.phpfile.
The wp-content Folder
The last core directory to keep your eye on is called wp-content. It’s arguably the most important folder from a user’s standpoint, considering it collects and stores all items that the user uploads to WordPress. Hence why it’s called wp-content, because the vast majority of user-generated content goes into the folder for delivery to the right places on your website.
Anything you write is stored elsewhere. Even though it seems like an article would be considered “content,” all written words go into your WordPress database.
Where is wp-content located? The same place as the other core directories, under the public directory and next to the likes of wp-admin and wp-includes.
Opening the wp-content folder reveals the folders that contain everything from themes to plugins and uploads.

Opening the “plugins” folder shows whatever plugins you currently have installed on your WordPress site. You have the option to add a plugin file into this folder via FTP, instead of uploading from the WordPress dashboard. The same can be said for the themes directory if you’d like to upload theme files directly.

Speaking of themes, the themes directory holds every theme folder you have installed on your site, not just the one that’s currently active.

Finally, a deeper dig into the uploads directory brings you to a collection of images and other media types stored in the WordPress Media Library. In short, anything uploaded to WordPress goes here. You can drag in a JPG or PNG file from your computer (if working through an FTP client) or even remove one of the uploads if you’re having trouble getting rid of it through the dashboard.

When to Use the wp-content Directory
When working with WordPress, there are several situations where you may want to interact with the wp-content directory. It’s not as off-limits as some of the other core files, seeing as how this is where your uploads, theme files, and plugin files end up. In addition, the non-technical WordPress user can understand that a PNG file is an image, making it more akin to an interface that the average user is comfortable with.
Here are some cases where you may tap into the wp-content directory:
- If you’d like to rename the directory – The
wp-contentname isn’t required. Some people change the name so as to hide it from potential attackers. The WordPress directory structure is common knowledge, so someone who gains access to your files would have a harder time finding yourwp-contentdirectory. - When fixing errors – When an error occurs on your website it’s possible that a theme or plugin caused the crash or error. If you can’t access WordPress admin or the dashboard, going to the
wp-contentfolder is a way to modify or remove elements that cause the error in the first place. - To upload content through an FTP – Sometimes it’s easier to add or remove an image or theme file through an FTP connection rather than doing so in the WordPress dashboard.
A Recap of the Core Files and Folder
The WordPress core files go much deeper than this, yet the ones covered so far come together to push WordPress towards full functionality. As a summary, here’s a shortlist of each WordPress file and directory we’ve discussed, with descriptions to go with them:
- .htaccess – Takes control of all files and folders and grants access to them when needed. It’s also the file that handles the permalink structure. If working with a site on Kinsta, you won’t have an
.htaccessfile. Instead, the vast majority of capabilities are completed on the Kinsta dashboard. - wp-config – Limits its primary functionality to controlling things like automated updates and the database configuration. Basic WordPress settings are also handled in the
wp-configfolder. - admin.php – This is the file that carries the load for the backend, telling the admin dashboard how to function.
- wp-includes – Contains most of the standard WordPress coding and serves as the library of resources whenever another file needs to complete a task, both on the frontend and backend.
- functions.php – There’s one of these files inside the
wp-includesdirectory as well as inside theme files. The file can be edited for adding new features to your website or to modify features already implemented by default. - wp-content – This file stores any items you upload or add to your website as an admin or user. Some examples of content stored here include themes, plugins, and images.
WordPress Template Files
A template file often gets confused with a theme file, but it’s actually part of a theme directory, handling elements of your theme’s display and layout.
Although not all of them have the word “template” in their file names, the majority of files inside a theme directory are in fact template files (not the functions.php file).
The template files provide just that, templates for WordPress to render components of a theme the way you want them to appear. For instance, you would have a template for the comments section in most themes.

Other template files include the following:
- 404.php
- archive.php
- content.php
- footer.php
- header.php
- index.php
- sidebar.php
- page.php
These are commonly used for editing parts of your theme, separate from any edits made directly to the core WordPress design and functionality. Therefore, any removal of the theme would also take away any changes you made inside the template files.
The structure of theme directories makes quite a bit of sense, seeing as how you can go into the files and modify something like the header.php file to make the header look or act differently. The same can be said for the sidebar.php or the footer.php files. Any change to the footer.php file only affects the footer inside the theme, nothing else.
There are even specific templates for full pages, often named after those pages, like one for a full-width page or the home page.

Below is an example of a homepage template:
<?php
/**
* The template for displaying the homepage.
*
* This page template will display any functions hooked into the `homepage` action.
* By default this includes a variety of product displays and the page content itself. To change the order or toggle these components
* use the Homepage Control plugin.
* https://wordpress.org/plugins/homepage-control/
*
* Template name: Homepage
*
* @package storefront
*/

get_header(); ?>

<div id="primary" class="content-area">
<main id="main" class="site-main" role="main">

<?php
/**
* Functions hooked in to homepage action
*
* @hooked storefront_homepage_content - 10
* @hooked storefront_product_categories - 20
* @hooked storefront_recent_products - 30
* @hooked storefront_featured_products - 40
* @hooked storefront_popular_products - 50
* @hooked storefront_on_sale_products - 60
* @hooked storefront_best_selling_products - 70
*/
do_action( 'homepage' );
?>

</main><!-- #main -->
</div><!-- #primary -->
<?php
get_footer();
These full template files typically hook into other files to render a nicely formatted design. The homepage, for example, includes hooks for parts like product categories and galleries, seeing as how I’m using an online store theme right now.
The template files covered before, like header.php, footer.php, and sidebar.php, are considered “template partials;” they are included as a portion of another template file. Like in the template-homepage.php file you may notice that it calls to the header.php file to include it as part of the template.
When to Use WordPress Template Files
Dozens of template files exist, some of which are full-page template files while others are partial template files. Consequently, it depends on the file when deciding what you plan on using them for.
It’s safe to say that any edit of a template file dynamically changes the layout or style of your website, as long as that template is being used in the first place.
As an example, inserting the get_header() template tag in the page.php file ensures that the header template you (or the theme developer) designed gets placed in all WordPress pages with the default template. This comes in handy for dynamic design, instead of editing every page individually.
Here are some other times you may edit template files:
- When making a duplicate
index.phpfile to perform edits to the main template file. It’s not wise to make direct changes to the original index.php file. - To add your own CSS to the style.css file.
- To dynamically modify the look of common templates like
home.php,page.php, andsingle.phpto see those changes reflected on all pages or posts. - To remove or add optional elements like comments, sidebars, and author pages. These, in particular, are blocked using the comments.php, sidebar.php, and author.php files, respectively.
- To make calls to partial template files in your full template files, like hooking to the footer.php file for all pages or posts.
WordPress Theme Directories
Theme directories (also called files or folders) organize the previously discussed template files.
The theme files are the folders you download from theme developers, whether it’s a free theme from the WordPress Theme Library or from a premium developer like one you’d find on Themeforest.
The theme folders are located under wp-content themes in your core WordPress file directory.
The theme files themselves are usually named after the theme you decide to install on your WordPress site, such as /twentyseventeen for the Twenty Seventeen theme.

The theme files hold everything needed to incorporate the theme’s functionality and design into your site.
This includes the many template files covered above, but technically, the only required theme files are as listed below:
- style.css
- index.php
- comments.php
- screenshot.png
These are required of a theme when submitting it to the WordPress Theme Library. It’s the bare minimum, but it makes sense seeing as how the style.css file contains the theme’s main stylesheet, the index.php file is the primary template file, the comments.php file is for including comments when allowed, and the screenshot.png file shows people downloading the theme what it looks like.
Other than that, theme file structures vary based on the theme’s purpose and how the developer likes to organize the files.
Take the Twenty Nineteen WordPress theme as an example.
The folder has expected files like 404.php, functions.php , and page.php.
Yet, the developer decided to include the following folders for organization purposes:
- /classes
- /fonts
- /inc
- /js
- /sass
- /template-parts

If we take a look at the popular Storefront Theme for WooCommerce, you’ll notice that not only do some of the template files vary, but the developer structures the folder directories in completely different ways.
Instead of having a separate fonts folder, it’s located under the assets folder. There are also some other folders in Storefront that we don’t see in the Twenty Nineteen theme:
- /assets
- /docs
- /e2e
- /inc
- /languages
- /projects

Overall, those folders are named differently because the themes have their own individual style and functionality, meaning that not all of the files are going to be the same. In addition, it’s clear that developer preference comes into play as well, from the naming of the files to the organization of the directory.
When to Use WordPress Theme Files
WordPress theme files are well-known to all WordPress users since even non-technical site owners typically need to work with them.
Although WordPress theme files have many applications, here are some primary instances to consider:
- To upload and activate a full WordPress theme through an FTP client, instead of searching for and installing a theme on the dashboard.
- When looking to troubleshoot an error on WordPress where you need to either delete or remove a full theme file or one of the files inside the directory.
- To incorporate new stylings or hooks in your template files.
- When you’d like to modify your style.css file by adding your own code.
- To remove or modify partial or full template files for styling purposes.
WordPress Language Files
Yet another area to think about in the wp-content directory involves languages.
A languages file can be stored in the wp-content directory when you’re running a non-English WordPress site.
In addition, language files are often included with plugins and themes, making it easier for you to translate the backend or frontend interfaces for those extensions.
A language file utilizes a framework set forth by WordPress so that WordPress developers can add written words to their plugin, theme, or even WordPress itself.
As mentioned, there’s a framework already in place to establish language rules, many of which are default messages or wording throughout the WordPress dashboard. However, language files are used to customize these messages or translate them into different languages entirely.
The idea behind a language file is similar to that of a child theme or duplicate index.php file. The goal is to not directly edit any program files, whether that’s inside WordPress or a plugin.
A simple example of the language framework in place can be shown when looking at the WordPress login module or the dashboard.
It’s easy to skim past all the written text in WordPress, but they’re all created using a file. For example, most of the language written on the login page is stored in WordPress’s core language file.

Even the little bits of text used all over your WordPress plugins, for things like tab labels, fields, and headings, get powered by a language file somewhere – in the case of a plugin like Yoast SEO, that plugin has its own language folder. The same can be said for themes.

Overall, a language folder doesn’t only set the geographical language but the default wording in English. So, you may find that a language file in your theme simply needs an edit to replace one English word with another. You could technically personalize the WordPress dashboard all you want, such as changing the Settings tab in the dashboard to “Design Stuff.” The Say What plugin is a decent solution for modifying those types of language strings without tampering with the core files.
Having said that, the language files are also there for translating plugins and themes and WordPress into an entirely different language altogether.
When to Use WordPress Language Files
Language files control the wording throughout your entire WordPress interface, and they empower you to modify that wording or translate it into other languages.
We’ll explain the best way to adjust language files below, but first, here are some situations in which you may need to do so:
- When WordPress, a plugin, or theme isn’t made in your native language and you’d like to translate the interface to make it understandable for you.
- You can translate an entire site if your core userbase utilizes a different language, or if you’re planning on expanding to a new market.
- To modify the default wording for your dashboard, plugin, or theme interface. The files allow you to change just about any text on buttons, tabs, or forms.
Now, how do you go about finding and using those language files? Luckily, WordPress already has a method for changing the site language, all without touching your core files.
In the WordPress dashboard, go to “Settings > General”.
Scroll down to the field called Site Language. Use the dropdown menu to select a new language. Be sure to save the settings.

After that, much of the dashboard interface gets translated into the language you chose, in this case, German.

Does that also translate all the plugins you have installed? Will the frontend of your website show a new language as well?
It depends.
The caveat behind a system-wide translation is that each of those other elements also needs to have the correct language file inside the plugin files. If, for example, a German language file exists in the Yoast SEO plugin, WordPress will go ahead and use the corresponding language file to translate the plugin as well. The same goes for WordPress themes.
Language support isn’t standardized, so it’s best to check the feature lists from the plugins and themes you plan to install.

It’s also important to mention that language files must sometimes be activated through the theme or plugin itself. Therefore, if you’re having a problem translating, seek out the plugin or theme settings that allow for the change instead of relying on the general language settings in WordPress.
As for simple language modifications (like changing a menu label in the dashboard,) we recommend the Say What plugin, Polylang, or a comparable plugin.
Finally, there are far more advanced language and translation capabilities for expanding the language reach on the frontend of your site. For instance, Polylang, TranslatePress, and Translate WordPress all provide excellent features for localization, frontend language pickers, and automated multilingual functionality. We recommend checking out our full multilingual WordPress guide to understand the benefits and methods for translation.
All About WordPress File Permissions
Checking the WordPress file and server permissions is one of the fundamental ways to improve WordPress security.
In short, WordPress file permissions restrict who can access files and what can be done with those files.
It may seem as if the strongest of file permissions is the most logical solution, but permissions that are too strict may end up causing problems with the functionality of your site. This is because your WordPress files need to be accessed by other files on a regular basis. You don’t want to lock them away so tightly that it’s impossible for them to do their jobs.
However, not having the right file permissions could open up an admin file to potential hackers or other intruders. Internal users should also be restricted from the right files to prevent any human errors that may occur.
How WordPress File Permissions are Structured
Computer file systems use permissions to indicate which users and other files can read, write, modify, and access the files.
Seeing as how WordPress files are stored on computer servers, the file permissions work in the same manner.
You can assign one of three permissions to each website file:
- Read – Indicates that a user can read the file.
- Write – Indicates that a user can edit or add to the file.
- Execute – Indicates that a user can execute the file as a script or run the file.
The same permissions are applicable for website directories, or collections of files.
Changing File Permissions
In WordPress, file permissions are set automatically to ensure your website runs smoothly and it’s protected as much as possible. However, there are times where you may need to change a file permission to access a folder or to boost your security.
It’s possible to modify your file permissions through an FTP Client, your host’s cPanel, or by using a WordPress plugin.
If you plan to go the plugin route, the iThemes Security plugin is a viable solution for scanning permissions and potentially making changes.
Kinsta doesn’t utilize a cPanel, so we’ll show you how to look at and alter permissions through an FTP client.
The process varies depending on the FTP tool, but FileZilla (and many other clients) allows you to right-click on any file and locate the File Permissions tab.

A new window appears for you to change file attributes and permissions. As you can see, files generally have permissions for the owner, the group, and for the public.
The owner refers to admin access. Group permissions are for users in your organization, and the public is everyone else, like random visitors who make accounts on your website.
Each category has the three permission options of Read, Write, and Execute. It’s possible for a file to be Readable, Writable, and Executable for one category, most likely the Owner.

You may also notice that a “Numeric Value” field is listed below the permissions. The numeric value is rather important as well. It’s a three-digit number, where the first digit indicates owner permissions, the second shows group permissions, and the third explains public permissions.
So, for example, the 7 in our numeric value for the wp-content folder only dictates what’s going on with the owner permissions. Because of this, the numbers in the Numeric Value field change when you check or uncheck a box in the permissions.
Here’s what the most common values mean:
- 755 – The owner can read, write, and execute. Everyone else can read and execute the file but not make any alterations. 755 is the standard for public files.
- 644 – The owner has read and write privileges while others can only read the file.
- 711 – The owner can do anything but all other users only have the execute capability.
- 700 – The owner has full control and everyone else is blocked from doing anything, including reading the file. This is one of the highest security permissions.
- 600 – The owner has read and write permissions. Everyone else is blocked entirely. The 600 value is even more secure than 700, making it best for private text files.
Although you typically shouldn’t have to change permissions much, below are a few suggestions for peak security and functionality within your files and directories:
- The
wp-configfile should have a 440 or 400 value so that outsiders are unable to read the file. This also restricts the owners from making mistakes with the file. - All other WordPress files should have a 644 or 640 numeric value.
- Directories require full owner control, so permissions of 755 or 750 are recommended.
- Don’t ever have a permission value of 777. Groups, and the public, don’t need full access to edit your WordPress files. This goes for upload files as well, even if some of them don’t seem all that important.
- The
.htaccessfile is yet another extremely important core file. Therefore, a permission of 440 or 400 is suggested. There’s no reason to provide full writing or executing access to anyone, including the owner. This prevents accidental errors.
To explore the in-depth nature of file permissions and how to change them, view the WordPress support article on Changing File Permissions.
Restrict Access to Media Files in WordPress
Media files are front-facing elements in your WordPress file directory, where all users see them and often have the ability to copy or save them from a browser.
In fact, the average user comes to your site and has the opportunity to find the direct link to that file and download it to their own computer.
Media uploads are some of the least protected elements in your file directory. Sometimes that’s not a problem. Many bloggers would rather have their photos and videos shared across the internet, even if it means those users doing the sharing are technically breaking copyright laws.
Having said that, other businesses have more private data being stored in their media files, or the media is what’s being sold in the first place; think photographers and video creators who want to prevent their images from being pulled from their websites for free.
Media file restrictions are also useful if you run a multi-author publication, since it can get cluttered and confusing for your authors to see the files from every other author in the organization.
Whether you’d like to keep media private for security or for organization, there are special ways to go about restricting access to your media files in WordPress.
The first method entails an edit to your primary functions.php file.
Open the file in your FTP client and add the following code.
// Limit media library access

add_filter( 'ajax_query_attachments_args', 'wpb_show_current_user_attachments' );

function wpb_show_current_user_attachments( $query ) {
$user_id = get_current_user_id();
if ( $user_id && !current_user_can('activate_plugins') && !current_user_can('edit_others_posts
') ) {
$query['author'] = $user_id;
}
return $query;
}
After you save the file, the new code checks what each user can do on your website. Media is displayed based on their current user types and checking if those user types allow them to complete tasks like editing posts or activating plugins. If those user type requirements aren’t met, the media files are blocked.
If you’d rather utilize a plugin for restricting access to media files, check out plugins like Prevent Direct Access (with the File Access Restriction extension) or File Manager Advanced to gain control over how your media files are shown to others. Other plugins, like Photo Gallery by 10Web, make it impossible to right-click and download media files. Although it’s not a perfect blocking solution, it adds to the security.
Managing and Moderating Your WordPress Files
Accessing your WordPress files is done through an FTP client, your host cPanel, or the WordPress dashboard.
If you have questions about tapping into your files through an FTP client, or any of the possible methods, refer back to the section titled “How Do I Access WordPress Files?” earlier on in this article. The guide on how to use SFTP to connect to your WordPress site is also a useful resource.
But what happens when you get to your files? Many of the sections in this article outline situations in which you may find yourself editing or moving WordPress files, yet it’s also essential to know about some of the simpler tasks, whether it’s done through the dashboard, an FTP client, or another means.
For instance, you may wonder how to upload or download a file to WordPress and which methods are the best for doing so. The same can be said for site backups or the organization of media files, since the usual FTP solution is not always the best route.
Keep reading for clarity on these topics.
How to Upload Files to WordPress
There are numerous file types that you can upload to WordPress. Common examples include:
- An HTML file for verifying your website ownership or changing your website design.
- A media file, such as a PNG, JPEG, or video.
- A new theme or plugin file to change the functionality or look of your site.
- A document to be displayed on a page or blog post for informational purposes.
- Audio files to present music for a band or to sell stock clips.
WordPress has a long list of supported file types for uploading through the dashboard. These include options like JPG, PNG, PDF, MP3, WMV, and many more.
Most file types being uploaded to the dashboard are media elements, whereas design files like HTML documents usually get uploaded through an FTP client (although some situations allow for an HTML file to be uploaded through the dashboard or your cPanel).
Your file type, and the reason you’re uploading the file in the first place, generally decides your method of upload. We’ll cover the most common file upload methods for WordPress files, both for your core files and other site items like media.
Upload WordPress Files Through the Dashboard
Uploading options are plentiful in the WordPress dashboard. You have choices for importing files, uploading photos to pages, and even uploading elements through plugins you have installed.
The first, and most basic, file upload to WordPress involves media. Whether it’s a picture, video, or audio clip, they all get stored in the Media Library. For a full look into the topic, read our in-depth guide on the WordPress Media Library.
The simplest way to upload a WordPress file to the Media Library is to go to your dashboard and click on Media > Add New.

Click the Select Files button to open a window that reveals the files on your computer.

Locate the file you’d like to upload and click the Open button. As mentioned before, WordPress supports a wide range of files, particularly when it comes to media. However, you may encounter an error if your file type isn’t allowed.

Now the file is located in your dashboard’s Media Library along with the wp-content folder of your core site files. You can locate the new media file in the wp-content folder by using an FTP client.
As for accessing the file in the dashboard, all you have to do is click on the Edit button to see its details.

The Edit page shows several options for editing the photo file, adding metadata, and more. Each media file uploaded to WordPress receives a file URL, or the internet address on which that file is located. If you copy that URL into a browser the file will appear on your screen.

Another common way to upload a file through the WordPress dashboard is on a page or post.
For this, go open a new or old page or post and search through the Gutenberg modules. The classic WordPress interface has a Media button to upload files there.
Just about every block under the Media section in Gutenberg has an option to upload a file to WordPress. For instance, you could choose the Video block and upload a file, or the Gallery block to upload several image files.

Here’s a visual. When you choose the Image block it shows up in the WordPress blog post editor.
An Upload button appears for you to go through the same process of opening a file from your computer files and adding it to your site. As always, a file uploaded through this method is also placed in your Media Library and the wp-content folder.

Once the file is uploaded it also appears on your post or page, seeing as how that’s often the place you’re attempting to place it anyway.